
openid-connect
The openid-connect plugin supports the integration with OpenID Connect (OIDC) identity providers, such as Keycloak (opens in Apache APISIX docs), Auth0 (opens in Apache APISIX docs), Microsoft Entra ID (opens in Apache APISIX docs), Google (opens in Apache APISIX docs), Amazon Cognito (opens in Apache APISIX docs), and Okta (opens in Apache APISIX docs). It allows APISIX to authenticate clients and obtain their information from the identity provider before allowing or denying their access to upstream protected resources.
Examples
Authorization Code Flow
The authorization code flow is defined in RFC 6749, Section 4.1. It involves exchanging a temporary authorization code for an access token, and is typically used by confidential and public clients.
The following diagram illustrates the interaction between different entities when you implement the authorization code flow:
When an incoming request does not contain an access token in its header nor in an appropriate session cookie, the plugin acts as a relying party and redirects to the authorization server to continue the authorization code flow.
After successful authentication, the plugin keeps the token in the session cookie, and subsequent requests will use the token stored in the cookie.
See Set Up SSO with Keycloak (opens in Apache APISIX docs) for an example that uses the openid-connect plugin with the authorization code flow.
See Secure OIDC with PAR and DPoP (opens in Apache APISIX docs) for an example to use the openid-connect plugin to integrate with Keycloak using PAR, DPoP, PKCE, and private_key_jwt client authentication.
Proof Key for Code Exchange (PKCE)
The Proof Key for Code Exchange (PKCE) is defined in RFC 7636. PKCE enhances the authorization code flow by adding a code challenge and verifier to prevent authorization code interception attacks.
The following diagram illustrates the interaction between different entities when you implement the authorization code flow with PKCE:
See Set Up SSO with Keycloak (opens in Apache APISIX docs) for an example that uses the openid-connect plugin with the authorization code flow and PKCE.
Authorization Code Flow with PAR and DPoP
PAR, PKCE, private_key_jwt, and DPoP can be combined in one authorization code flow. Configure separate signing keys for client authentication and DPoP. This workflow was introduced in API7 Enterprise 3.9.18 and 3.10.5, and in APISIX 3.18.0.
In this workflow, the gateway is the DPoP client for token and user-info calls to the authorization server. It does not validate DPoP proofs from external clients calling the protected route.
For an APISIX deployment, see Secure OIDC with PAR and DPoP (opens in Apache APISIX docs) for a tested Keycloak example with key generation, configuration, and verification.
Client Credentials Flow
The client credentials flow is defined in RFC 6749, Section 4.4. It allows a client to request an access token with its own credentials for machine-to-machine access, without acting on behalf of a specific user.
The following diagram illustrates the interaction between different entities when you implement the client credentials flow with local JWT verification, such as by configuring public_key or use_jwks:
See Authorize M2M Requests with Keycloak (opens in Apache APISIX docs) for an example that uses the openid-connect plugin with the client credentials flow and local JWT validation.
Introspection Flow
The introspection flow is defined in RFC 7662. It involves verifying the validity and details of an access token by querying an authorization server’s introspection endpoint.
In this flow, when a client presents an access token to the resource server, the resource server sends a request to the authorization server’s introspection endpoint, which responds with token details if the token is active, including information like token expiration, associated scopes, and the user or client it belongs to.
The following diagram illustrates the interaction between different entities when you implement the authorization code flow with token introspection:
See Authorize M2M Requests with Keycloak (opens in Apache APISIX docs) for an example that uses the openid-connect plugin with the client credentials flow and token introspection.
Refresh Token Grant
The refresh token grant is defined in RFC 6749, Section 6. It allows a client to request a new access token with a previously issued refresh token, without requiring the user to authenticate again. Refresh-token availability and lifetime depend on the authorization server and the flow that issued the original tokens.
User Info
The UserInfo endpoint in OpenID Connect (OIDC) is defined in OpenID Connect Core 1.0, Section 5.3. It enables clients to retrieve additional claims about an authenticated user by presenting a valid access token. This endpoint is particularly useful for obtaining user profile information, such as name, email, and other attributes, after the user has been authenticated. The data returned by the UserInfo endpoint depends on the scope of the access token and the claims configured by the authorization server.
The following diagram illustrates the interaction between different entities when APISIX verifies the user info:
See Control Access by OIDC User Groups for an example to use the openid-connect plugin to integrate with Keycloak, and implement access control with the Enterprise acl plugin based on the user info.
Troubleshooting
This section covers a few commonly seen issues when working with this plugin to help you troubleshoot.
APISIX Cannot Connect to OpenID provider
If APISIX fails to resolve or cannot connect to the OpenID provider, double check the DNS settings in your configuration file config.yaml and modify as needed.
State Mismatch in an Authorization Callback
A callback can arrive after its authorization state was completed, replayed, or removed. In API7 Enterprise 3.9.18 and 3.10.5, and in APISIX 3.18.0, a stale GET callback outside Multi Auth is redirected to the originally requested URL. This starts a fresh authentication flow. If the identity provider still has an SSO session, the flow can complete without another prompt.
Callbacks that use another HTTP method, have no recoverable target URL, or run inside Multi Auth still fail instead of redirecting.
Identity Provider Temporarily Unavailable
In APISIX 3.18.0, an authorization callback containing the OAuth error temporarily_unavailable is redirected to the originally requested URL when its state can be verified. This restarts the authentication flow instead of returning 500 Internal Server Error.
Other OAuth errors, a missing or invalid state, and non-GET callbacks are not retried automatically.
No Session State Found
If you encounter a 500 internal server error with the following message in the log when working with authorization code flow, there could be a number of reasons.
the error request to the redirect_uri path, but there's no session state found1. Incorrect Redirection URI
A common configuration error is to set redirect_uri to the same URI as the route. When a user requests the protected resource, the request directly reaches the redirection URI without a session cookie, which produces the no session state found error.
Configure redirect_uri as a fully qualified URI with a path that matches the route without being identical to the protected request path. For example, if the route uri is /api/v1/*, set redirect_uri to https://gateway.example.com/api/v1/redirect. Configure the same URI as an allowed redirect URI in the OpenID provider.
If redirect_uri is not configured or is a root-relative path beginning with /, the gateway constructs the URI from the request scheme and host. A fully qualified URI avoids relying on this request-derived origin.
2. Missing Session Secret
When bearer_only is false, explicitly configure session.secret. APISIX rejects the plugin configuration when this field is missing, whether configuration is stored in etcd or loaded from standalone YAML (opens in Apache APISIX docs). Use at least 16 characters. In multi-instance deployments, use the same secret on every gateway instance that needs to read the encrypted session cookies.
3. Cookie Not Sent or Absent
Check if the SameSite cookie attribute is properly set (i.e. if your application needs to send the cookie cross sites) to see if this could be a factor that prevents the cookie being saved to the browser's cookie jar or being sent from the browser.
4. Authorization Session Expired
APISIX stores the state and original request URL in a session before redirecting the browser to the identity provider. If that session expires before the browser returns to the redirection URI, APISIX cannot validate the callback or recover the original URL.
Start a new authentication flow by navigating to the protected URL again. If users need more time to complete authentication, configure session.idling_timeout with a suitable value. The default idling timeout is 900 seconds.
5. Upstream Sent Too Big Header
If you have NGINX sitting in front of APISIX to proxy client traffic, see if you observe the following error in NGINX's error.log:
upstream sent too big header while reading response header from upstreamIf so, try adjusting proxy_buffers, proxy_buffer_size, and proxy_busy_buffers_size to larger values.
Alternatively, adjust the plugin's session_contents parameter to include only the necessary information. For instance, to include only the access token and refresh token, you can configure the plugin as such:
{
  ...
  "plugins": {
    "openid-connect": {
      ...,
      "session_contents": {
        "access_token": true
      }
    }
  }
}
Available options are id_token, user, enc_id_token, and access_token (which includes the refresh token). When this field is not configured, everything is included in the session.
6. Invalid Client Secret
Verify client_secret for flows that authenticate to the provider with a shared secret, such as token introspection or an authorization code flow without PKCE. The field is optional for bearer-only local JWT/JWKS validation, non-bearer PKCE, and applicable private_key_jwt modes. In a secret-bearing flow, an invalid value causes authentication to fail and no token is stored in the session.
The default introspection_endpoint_auth_method is client_secret_basic, which sends the client credentials in the Authorization header. If the provider expects them in the introspection request body, set the method to client_secret_post.
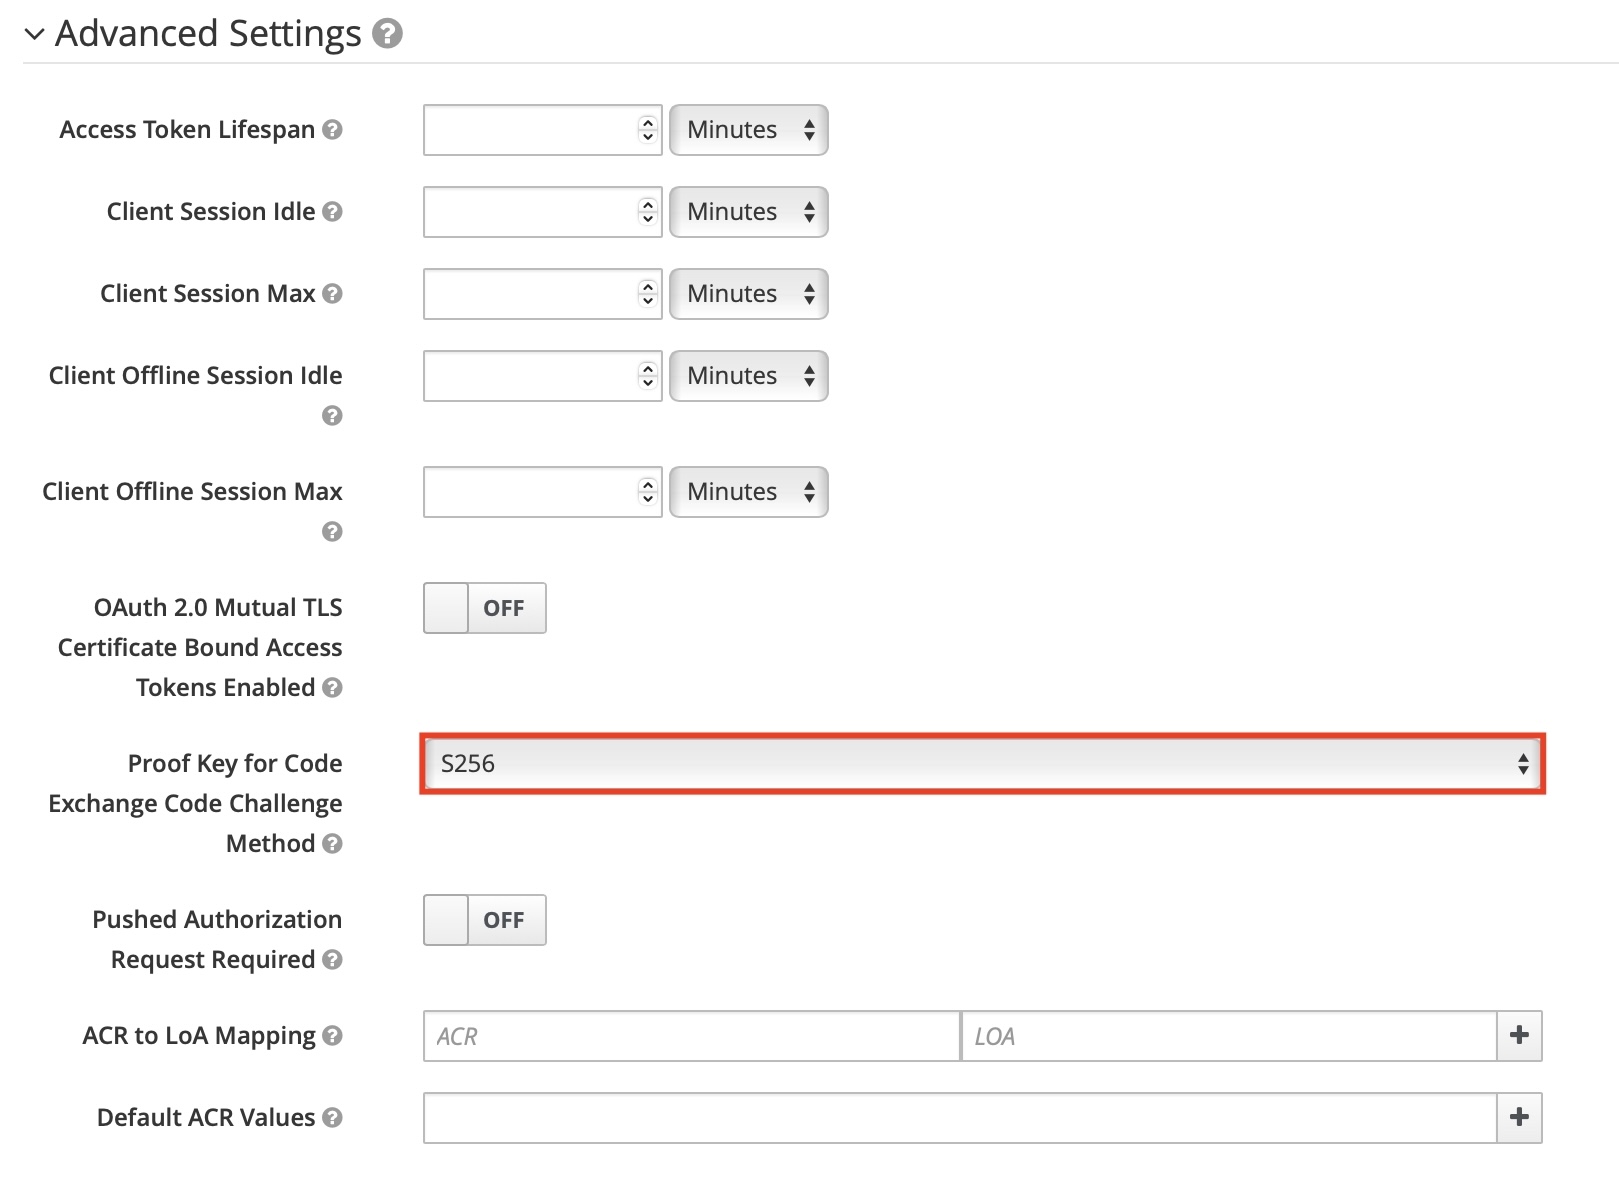
7. PKCE IdP Configuration
If you are enabling PKCE with the authorization code flow, make sure you have configured the IdP client to use PKCE. For example, in Keycloak, you should configure the PKCE challenge method in the client's advanced settings: